Wednesday, November 14, 2007

Mixins in Java

Mixins are powerful programming concept in dynamic languages because they allow you to implements aspects of classes in different places and then "plug" them together. For example, the "tree" aspect of a data structure (something having parents and children) is well understood. A lot of data can be arranged in hierarchic trees. Yet, in many languages, you cannot say:

   class FileTreeNode extends File mixin TreeNode

to get a class which gives you access to all file operations and allows to arrange the items in a tree at the same time. This means you can't directly attach it to a tree viewer. In some languages, like Python, this is trivial since you can add methods to a class any time you want. Other languages like C++ have multiple inheritance which allows to do something like this. Alas, not at runtime.

For Java, the Eclipse guys came up with a solution: adapters. It looks like this:

    public  T getAdapter (Class desiredType)
    {
        ... create an adapter which makes "this" behave like "desiredType" ...
    }

where "desiredType" is usually an interface of some kind (note: The Eclipse API itself is still Java 1.4, this is the generics version to avoid the otherwise necessary cast).

How can you use this?

In the most simple case, you can just make the class implement the interface and "return this" in the adapter. Not very impressive.

The next step is to create a factory which gets two bits of information: The object you want to wrap and the desired API. On top of that, you can use org.eclipse.core.internal.runtime.AdapterManager which allows to register any number of factories for adapters. Now, we're getting somewhere and the getAdapter() method could look like this:

    @SuppressWarnings("unchecked")
    public  T getAdapter (Class desiredType)
    {
        return (T)AdapterManager.getDefault ().getAdapter (this, desiredType);
    }

This allows me to modify the behavior of my class at runtime more cheaply and safely than using the Reflection API. Best of all, the compiler will complain if you try to call a method that doesn't exist:

    ITreeNode node = file.getAdapter(ITreeNode.class);
    ITreeNode parent = node.getParent(); // okay
    node.lastModification(); // Sorry, this is a file method

Try this with reflection: Lots of strings and no help. To implement the above example with an object that has no idea about trees but which you want to manage in a tree-like structure, you need this:

  • A factory which creates a tree adapter for the object in question.
  • The tree adapter is the actual tree data structure. The objects still have no idea they are in a tree. So adding/removing objects will happen in the tree adapter. Things get complicated quickly if you have some of the information you need for the tree in the objects themselves. Think files: You can use listFiles() to get the children. This is nice until you want to notify either side that a file has been created or deleted (and it gets horrible when you must spy on the actual filesystem for changes).
  • The factory must interact with the tree adapter in such a way that it can return existing nodes if you ask twice for an adapter for object X. This usually means that you need to have a map to lookup existing nodes.

A very simple example how to use this is to allow to override equals() at runtime. You need an interface:

interface IEquals {
    public boolean equals (Object other);
    public int hashCode ();
}

Now, you can define one or more adapter classes which implement this interface for your objects. If you register a default implementation for your object class, then you can use this code in your object to compare itself in the way you need at runtime:

    public boolean equals (Object obj)
    {
        return getAdapter (IEquals.class).equals (obj);
    }

Note: I suggest to cache the adapter if you don't plan to change it at runtime. This allows you to switch it once at startup and equals() will still be fast. And you should not try to change this adapter when the object is stored as a key in a hashmap ... you will have really strange problems like set.put(obj); ... set.contains(obj) -> false etc.

Or you can define an adapter which looks up a nice icon depending on the class or file type. The best part is that you don't have API cross-pollution. If you have a file, then getParent() will return the parent directory while if you look at the object from the tree API, it will be a tree node. Neither API can "see" the other, so you will never have to rename methods because of name collisions. ITreeNode node = file.getAdapter(ITreeNode.class) also clearly expresses how you look at the object from now on: as a tree. This makes it much more simple to write reliable, reusable code.

Monday, November 12, 2007

Hollow Sphere in Blender

For a scene in one of my books (a public bath on the TAURUS), I need a ball of water suspended around the center of a large sphere. The sphere outside is the "ground" (you can walk around in it; it's like the Hollow Earth theory but my version is just the product of careful alien design using magic a.k.a hi-tech to control gravity). I decided to render this in Blender to get a feeling how such a thing might look. What would my character actually see when they step into the bath?

Boolean operators are traditionally a weak spot of Blender (they are a major strength of POV-Ray, if you like text-file driven modeling). I had some trouble to get it to work and if you want to achieve a similar effect, here is how I pulled it off.

Inside

First add the inner object (this makes selecting more simple). In my case that would be an Icosphere (Press "Space", Select "Add" -> "Mesh" -> "Icosphere") with 3 subdivisions (to make it appear somewhat round even at the edges) and a radius of "4.000". This should look roughly like this:

Since this is supposed to be the inner volume of the object, there is a problem: Blender thinks it defines the outside. The key information are the "face normals". Open the mesh tools (Press "F9") and select "Draw Normals" on the far right (in the "Mesh Tools1" tab; use the middle mouse button to drag the tab into view if you have to - it's on the far right). Now the sphere sprouts little cyan pimples. Zoom in and rotate the sphere and you'll see that they start on the center of each face and extend outwards. This is how Blender knows "outside" from "inside": The direction in which the face normals point is "outside".

To turn this into the inner volume, all you have to do is to click on "Flip Normals" ("Mesh Tools" Tab, third line, last button). If you have "Solid" rendering active, the face normals will become tiny dots because the triangle faces now hide the rest of them. The object will still look the same but now, you're "inside" of it. Since all objects in Blender are hollow, it doesn't mean much ... for now.

I want a ball of water and water doesn't have edges, so I also smooth the surface ("Set Smooth" at the bottom in the "Link and Materials" tab). This doesn't change the actual geometry; it just draws the object smoothly. In my version of Blender, the object suddenly went all black at this point. Probably because I haven't assigned a material, yet. Selecting "Solid" rendering helps.

Connecting Hole

I needed a connection between the two sides (there is a "hole" in the hollow water ball where you can swim from one side to the other if you don't want to dive through it or use the walking spires or elevators in the restaurants), so I cut a hole in the inner sphere by selecting one vertice and deleting it (press "X" and select "Vertices"). In the image, you can see the lighter inside of the sphere shine through the hole:

Outside

Before I can create the outside, I must make sure that nothing is selected (or Blender would add the new points to the active object): Enter "Object Mode" ("Tab") and select nothing (Press "A" until nothing is highlighted anymore).

For the outside, I create another sphere. Make sure the cursor hasn't moved, so the centers of both objects are the same. If it isn't, select the sphere, press "Shift+S" (Snap) and then "Cursor -> Selection". When everything is ready, add the second icosphere: "Space" -> Add -> Mesh -> Icosphere, 3 subdivisions, Size "5.00". I also make that smooth but I leave the face normals alone (this is the outside after all).

Again, I delete the face where the connecting hole is supposed to be: Select a point (in "Edit Mode") and press "X" -> "Vertices". Now, you might face two problems: a) the hole in the inner sphere is somewhere else and b) the hole might be below the one you just cut but it's not perfectly aligned. If that is the case, you were in the wrong view.

When creating an icosphere (a sphere made of triangles instead of rectangles), the triangles don't have all the same size. If you rotate the sphere, you can see that they are uneven somewhat. I found that the triangles touching the horizontal axis are very even. The solution: Create the spheres in one view (for example YZ) and cut the holes in another (for example XZ). So after doing everything again and cutting in the right views, it should look like this:

As you can see, I did erase the vertice on the Y axis. Next, shift select both objects (use the outliner if you have problems with the inner sphere) and join the objects (use the menu or "Ctrl+J").

Smoothing Out the Wrinkles

After joining, it's simple to close the whole: Switch to "Edit Mode", select all vertices (six on the inner sphere, six on the outer, sequence doesn't matter) and "fill" them with faces (in the menu Edit -> Faces -> Fill or Shift+F). If you rotate the scene, you'll see that new triangles have been created but they look ugly in the otherwise smooth surface of the ball. Even using "Set Smooth" doesn't help; the angles between the hole and the rest of the surface is just too big (mostly perpendicular). To fix this, use "Subdivide" ("Mesh Tools" tab) and "Smooth" (same tab). This halves the selected faces, creating new ones and the smooth step evens the angles. For me, it now looked like this:

Holy ugly! What's wrong? I've left a hint ... can you find it?

It's the face normals again. For some reason, they point into the wrong direction around the hole. After a few undo steps (press "U"), I'm back at the point where the faces have just been created (before the smooth/subdivide steps). One "Flip Normals" later, the color transitions around the hole look much smoother. Back to another round of subdividing and smoothing. After the hole was as I wanted it, I noticed that the "horizon" of the ball still looked rough, so I selected all vertices, did another subdivide and several smooth to end with this result:

Pretty smooth, eh?

Rendering ... With POV-Ray

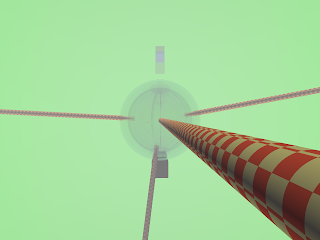
After fumbling with water that looks at least a bit realistic, I created the same scene with KPovModeler (with water but without the hole *sigh*) to give you an idea what someone, standing on the "ground" would see:

Each piece of the red-white checker pattern on the walking spires is 10x10m, the ball hovers 1250m above the observer, has a diameter of 500m and the water is 50m thick/deep. The two blue cubes are both 100m big, one is standing on the opposite side on the "ground", the other floats on the water. Anyone wants to add the water-slides, diving platforms (1250m jump!), etc.? With that much water and these dimensions, we'll probably also have clouds, too. The spires don't hold the water there, by the way, they are just a means of transport (if you don't want to jump or use the slides).